
FreeMindのMapファイル(拡張子 .mm)をBetwixtを使って読み書きする!
FreeMindとはマインドマップを作るソフトです。
入手先等はこちらをどうぞ
FreeMindのファイルは拡張子 .mm のファイルです。
このファイル形式はXMLです。
ここでは以下のようなFreeMindファイルを例にします。
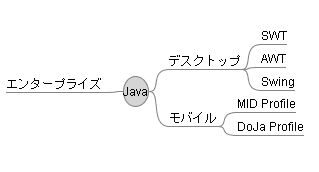
例
<map version="0.7.1">
<node TEXT="Java">
<node TEXT="デスクトップ" POSITION="right">
<node TEXT="SWT"/>
<node TEXT="AWT"/>
<node TEXT="Swing"/>
</node>
<node TEXT="モバイル" POSITION="right">
<node TEXT="MID Profile"/>
<node TEXT="DoJa Profile"/>
</node>
<node TEXT="エンタープライズ" POSITION="left"/>
</node>
</map>
ここでは例にあるように単純なTEXTとPOSITIONのみを扱うことにします。
準備
Commosn Betwixtを使います。Betwixtに関しての説明はこちらをどうぞ!
JavaBeanクラスを作成する
MapエレメントとNodeエレメントに対応するJavaBeanを作成する必要があります。
Map
Mapにはバージョン情報がありますが、今回は0.7.1の固定値とします。
するとNodeのみ追加する形になります。
そうなると、以下のようになります。
/*
 * Created on 2004/10/20
 * Author aki@www.xucker.jpn.org
 * License Apache2.0 or Common Public License
 */
package org.jpn.xucker.freemind;

import java.util.List;
import java.util.Vector;

/**
 *
 *
 */
public class Map {
    List nodeList=new Vector();
    public void addNode(Node node){
        nodeList.add(node);
    }

    public Node[] getNodes(){
        return (Node[])nodeList.toArray(new Node[nodeList.size()]);
    }
}
Node
NodeはTitleとPositionの文字列があり、またNodeを追加できる形になります。
するとこうなります。
package org.jpn.xucker.freemind;

import java.util.List;
import java.util.Vector;

/**
 *
 *
 */
public class Node {

private String text;
private String position;
List nodeList=new Vector();
/**
 * @param string
 */
public Node(){

}
public Node(String string) {
    this.text=string;
}
public String getPosition() {
    return position;
}
public void setPosition(String position) {
    this.position = position;
}
public String getText() {
    return text;
}
public void setText(String text) {
    this.text = text;
}
public void addNode(Node node){
    nodeList.add(node);
}

public Node[] getNodes(){
    return (Node[])nodeList.toArray(new Node[nodeList.size()]);
}
}
betwixtファイルを用意する
そして、betwixtファイルも用意します。属性を大文字にするため以下のようなbetwixtファイルを用意します。
Map.betwixt
<?xml version='1.0' encoding='Shift_JIS' ?>
<info primitiveTypes="attribute">
<element name='map'>
<attribute name="version" value="0.7.1"/>
<element name="node" property="nodes"/>
<addDefaults/>
</element>
</info>
Node.betwixt
<?xml version='1.0' encoding='Shift_JIS' ?>
<info primitiveTypes="attribute">
<element name='node'>
<attribute name="TEXT" property="text"/>
<attribute name="POSITION" property="position"/>
<element name="node" property="nodes"/>
<addDefaults/>
</element>
</info>
読み込む
ここまで容易できたら後は、簡単です。TEXTの値がエンコードされてますが、
読み込み時には自動でデーコードされます。
なので、以下のようなメソッドでXMLファイルを、Mapクラスを読み込めます。
XMLファイルをFileReaderに変換する必要がありますが。
public static Map readMap(Reader input){
    BeanReader reader=new BeanReader();
    //reader.getBindingConfiguration().setObjectStringConverter(new ConvertUtilsObjectStringConverter());
    Map map=null;
    try {
        reader.registerBeanClass(Map.class);
        map=(Map)reader.parse(input);
    } catch (IntrospectionException e1) {
        // TODO Auto-generated catch block
        e1.printStackTrace();
    } catch (IOException e) {
        // TODO Auto-generated catch block
        e.printStackTrace();
    } catch (SAXException e) {
        // TODO Auto-generated catch block
        e.printStackTrace();
    }

    return map;
}
書き出す
書き出しに関して、ここは私の勉強不足のため、すごくブサイクなコードになっています。
betwixt上で、属性のCharのエンコードの制御の仕方を知らないからです。
非アスキーコードは、手動で、toHexStringしています。
public static void writeMap(Writer output,Map map){
    BeanWriter writer =null;
    BindingConfiguration config=new BindingConfiguration();
    config.setMapIDs(false);

    writer.setBindingConfiguration(config);

        StringWriter out=new StringWriter();
        writer= new BeanWriter(out);


    try {
        writer.write(map);
        writer.close();
    } catch (IOException e) {
        // TODO Auto-generated catch block
        e.printStackTrace();
    } catch (SAXException e) {
        // TODO Auto-generated catch block
        e.printStackTrace();
    } catch (IntrospectionException e) {
        // TODO Auto-generated catch block
        e.printStackTrace();
    }


    String text=out.getBuffer().toString();

    for(int i=0;i<text.length();i++){
     if((int)text.charAt(i)>0x7f){
          try {
            output.write(toHexString(text.charAt(i)));
        } catch (IOException e1) {
            // TODO Auto-generated catch block
            e1.printStackTrace();
        }
     }else{
         try {
             output.write((int)text.charAt(i));
        } catch (IOException e1) {
            // TODO Auto-generated catch block
            e1.printStackTrace();
        }
     }
    }
}

public static String toHexString(char ch){
    int v=(int)ch;
    String hex=Integer.toHexString(v);
    return "&#x"+hex+";";
}
関連
tab2tree テキスト(TabTreeをHTML風のTreeやFreeMind形式に出力)でこのコードを使用しています。
