
Sponsored link
BorderLayout(Draw2D/GEF - Java Eclipse)
おなじみのBorderLayoutです。Figureの位置を上・下・左・右・中央から選びます。
レイアウトの位置は、親Figureに追加時に、BorderLayout.TOP 等をConstantsの引数の位置へ渡します。
Constantsを追加しないとレイアウトが機能しません。
機能
水平・垂直のスペース
setHorizontalSpacing(int space);
setVerticalSpacing(int space)
にて指定可能
例
5箇所に追加
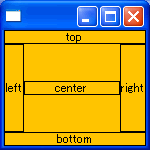
		BorderLayout layout=new BorderLayout();

		panel.setLayoutManager(layout);

		set(panel,"top",BorderLayout.TOP);
		set(panel,"bottom",BorderLayout.BOTTOM);
		set(panel,"center",BorderLayout.CENTER);
		set(panel,"left",BorderLayout.LEFT);
		set(panel,"right",BorderLayout.RIGHT);
5箇所に追加・スペース指定

水平には20pixel・垂直には10pixelスペースを空けるよう指定
		BorderLayout layout=new BorderLayout();
		layout.setHorizontalSpacing(20);
		layout.setVerticalSpacing(10);

		panel.setLayoutManager(layout);
		--略--
3箇所に追加
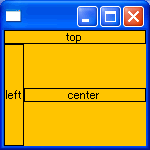
上・左・中央に追加した場合
コード全文
GEFに含まれるdraw2d.jarが必要です。
コードはCVSからダウンロードできます。
/*
 * Created on 2005/08/02
 * Author aki@www.xucker.jpn.org
 * License Apache2.0 or Common Public License
 */
package example.draw2d.first;

import org.eclipse.draw2d.BorderLayout;
import org.eclipse.draw2d.ColorConstants;
import org.eclipse.draw2d.Figure;
import org.eclipse.draw2d.FigureCanvas;
import org.eclipse.draw2d.Label;
import org.eclipse.draw2d.LineBorder;
import org.eclipse.draw2d.Panel;
import org.eclipse.swt.SWT;
import org.eclipse.swt.layout.FillLayout;
import org.eclipse.swt.widgets.Display;
import org.eclipse.swt.widgets.Shell;

/**
 *
 *
 */
public class BorderLayoutTest {

    public BorderLayoutTest(Shell shell) {

		shell.setBounds(0,0,150,150);
		shell.setLayout(new FillLayout(SWT.VERTICAL));

		FigureCanvas canvas = new FigureCanvas(shell);
		Panel panel=new Panel();
		panel.setBackgroundColor(ColorConstants.orange);
		canvas.setContents(panel);

		BorderLayout layout=new BorderLayout();
		layout.setHorizontalSpacing(20);
		layout.setVerticalSpacing(10);

		panel.setLayoutManager(layout);

		set(panel,"top",BorderLayout.TOP);
		set(panel,"bottom",BorderLayout.BOTTOM);
		set(panel,"center",BorderLayout.CENTER);
		set(panel,"left",BorderLayout.LEFT);
		set(panel,"right",BorderLayout.RIGHT);


    }
    public void set(Figure parent,String label,Object constants){
        Label labelFigure=new Label(label);
        labelFigure.setBorder(new LineBorder());
        parent.add(labelFigure,constants);
    }

	public static void main(String[] args) {
		Display display=new Display();
		Shell shell=new Shell(display);


		BorderLayoutTest app=new BorderLayoutTest(shell);


		shell.open();

		while(!shell.isDisposed()){
			if (!display.readAndDispatch ()){
					display.sleep ();
				  }
		}
		display.dispose();
	}
}
