
Sponsored link
Draw2Dで透過風Figureを作る
Eclipseのプラグインの一つであるGEFに含まれるDraw2Dで擬似的に透明なFigureを作る方法を説明します。
ただしこの方法では、透過する1x1のpixelの画像を作成して、それをFigureの大きさだけ描画するだけなので、
このFigureに追加したFigureは透明にはなりません。
それでも背景が透明なだけでも雰囲気は出ますし、影(黒色)などを付けると立体感もでます。
(影とかを付けていくと動作が重くなってしまいますが)
例
この例はアルファー風Figureを2枚重ねています。
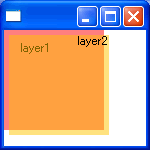
AlphaLayerFigure1の追加
AlphaLayerFigureはカラーと透明度を指定します。
AlphaLayerFigure figure1=new AlphaLayerFigure(ColorConstants.red,128);
figure1.setBounds(new Rectangle(0,0,100,100));
figure1.add(new Label("layer1"));
panel.add(figure1);
AlphaLayerFigure2の追加
こちらは文字が重なった時の雰囲気を体験してもらうため、FlowLayoutの右側でラベルを配置します。
AlphaLayerFigure figure2=new AlphaLayerFigure(ColorConstants.orange,128);
figure2.setBounds(new Rectangle(5,5,100,100));
FlowLayout layout=new FlowLayout();
layout.setMajorAlignment(FlowLayout.ALIGN_RIGHTBOTTOM);
figure2.setLayoutManager(layout);
figure2.add(new Label("layer2"));
panel.add(figure2);
AlphaLayerFigure
Constracter
指定のカラーのPaletteDataを作成します。
そして、それを元に、1x1pixelの透明度のあるイメージを作成します。
     public AlphaLayerFigure(Color color,int alpha){
            super();
            this.color=color;

            PaletteData palette=new PaletteData(new RGB[]{color.getRGB()});
            imageData = new ImageData(1,1,8,palette);
            imageData.alpha=alpha;
            imageData.setPixel(0,0,0);
            layerImage = new Image(null,imageData);


        }
カラーの変更;setColor()
カラーを変更したら、もう1度イメージを作成して、再描画します。
 this.color=color;
            imageData.palette.colors[0]=color.getRGB();
            if(layerImage!=null && !layerImage.isDisposed()){
                layerImage.dispose();
            }
            layerImage=new Image(null,imageData);
            repaint();
透明度の変更;setAlpha()
透明度も同じように処理します。
  public void setAlpha(int alpha){

            imageData.alpha=alpha;
            if(layerImage!=null && !layerImage.isDisposed()){
                layerImage.dispose();
            }
            layerImage=new Image(null,imageData);
            repaint();
        }
コード
コードはCVSからダウンロードできます。
/*
 * Created on 2005/07/28
 * Author aki@www.xucker.jpn.org
 * License Apache2.0 or Common Public License
 */
package example.draw2d;

import org.eclipse.draw2d.ColorConstants;
import org.eclipse.draw2d.Figure;
import org.eclipse.draw2d.FigureCanvas;
import org.eclipse.draw2d.FlowLayout;
import org.eclipse.draw2d.Graphics;
import org.eclipse.draw2d.Label;
import org.eclipse.draw2d.Panel;
import org.eclipse.draw2d.PolylineConnection;
import org.eclipse.draw2d.geometry.Rectangle;
import org.eclipse.swt.SWT;
import org.eclipse.swt.graphics.Color;
import org.eclipse.swt.graphics.Image;
import org.eclipse.swt.graphics.ImageData;
import org.eclipse.swt.graphics.PaletteData;
import org.eclipse.swt.graphics.RGB;
import org.eclipse.swt.layout.FillLayout;
import org.eclipse.swt.widgets.Display;
import org.eclipse.swt.widgets.Shell;

/**
 *
 *
 */
public class AlphaTest {


    /**
     * @param shell
     */
    public AlphaTest(Shell shell) {

		shell.setBounds(0,0,150,150);
		shell.setLayout(new FillLayout(SWT.VERTICAL));

		FigureCanvas canvas = new FigureCanvas(shell);
		Panel panel=new Panel();
		panel.setBackgroundColor(ColorConstants.white);

		canvas.setContents(panel);

		AlphaLayerFigure figure1=new AlphaLayerFigure(ColorConstants.red,128);
		figure1.setBounds(new Rectangle(0,0,100,100));
		//figure1.setLayoutManager(new FlowLayout());
		figure1.add(new Label("layer1"));
		panel.add(figure1);

		AlphaLayerFigure figure2 = new AlphaLayerFigure(ColorConstants.orange,128);
        figure2.setBounds(new Rectangle(5,5,100,100));
		FlowLayout layout=new FlowLayout();
		layout.setMajorAlignment(FlowLayout.ALIGN_RIGHTBOTTOM);
		figure2.setLayoutManager(layout);
		figure2.add(new Label("layer2"));
		panel.add(figure2);

    }


    public static void main(String[] args) {

        Display display=new Display();
    	Shell shell=new Shell(display);


    	AlphaTest app=new AlphaTest(shell);


    	shell.open();

    	while(!shell.isDisposed()){
    		if (!display.readAndDispatch ()){
    				display.sleep ();
    			  }
    	}
    	display.dispose();
    }

    public class AlphaLayerFigure extends Figure{
        private int alpha;
        private Color color;
        protected Image layerImage;
        private ImageData imageData;

        public AlphaLayerFigure(Color color,int alpha){
            super();
            this.color=color;

            PaletteData palette=new PaletteData(new RGB[]{color.getRGB()});
            imageData = new ImageData(1,1,8,palette);
            imageData.alpha=alpha;
            imageData.setPixel(0,0,0);
            layerImage = new Image(null,imageData);


        }
        public void setAlpha(int alpha){
            imageData.alpha=alpha;
            if(layerImage!=null && !layerImage.isDisposed()){
                layerImage.dispose();
            }
            layerImage=new Image(null,imageData);
            repaint();
        }
        public int getAlpha(){
            return imageData.alpha;
        }
        public void setColor(Color color){
            this.color=color;
            imageData.palette.colors[0]=color.getRGB();
            if(layerImage!=null && !layerImage.isDisposed()){
                layerImage.dispose();
            }
            layerImage=new Image(null,imageData);
            repaint();
        }
        public Color getColor(){
            return color;
        }

        public void paintFigure(Graphics g){

             Rectangle rectangle=getClientArea();
           g.drawImage(
                layerImage,new Rectangle(layerImage.getBounds()),rectangle);
        }

        }

}
関連
この手法は、オープンソースソフト akJ Subplayerで使っています。
